
2023. 3. 28. 01:22ㆍDevelopers 공간 [Shorts]/Frontend
<분류>
A. 수단
- OS/Platform/Tool : Linux, Kubernetes(k8s), Docker, AWS
- Package Manager : node.js, yarn, brew,
- Compiler/Transpillar : React, Nvcc, gcc/g++, Babel, Flutter
- Module Bundler : React, Webpack, Parcel
B. 언어
- C/C++, python, Javacsript, Typescript, Go-Lang, CUDA, Dart, HTML/CSS
C. 라이브러리 및 프레임워크 및 SDK
- OpenCV, OpenCL, FastAPI, PyTorch, Tensorflow, Nsight
1. What? (현상)
Flutter는 2D로 보이지만, 사실 사용하지 않을 뿐 3D로 Rendering되는 중이고, 3D Rendering에 더 최적화되어있다고 할 수 있습니다.
이번엔 버튼에 Transform과 Animation을 활용해 애니메이션 효과를 주는 방법을 정리하고자 합니다.
구현은 Stateful 위젯으로 진행했으며, 아래와 같은 에러메시지를 피하려면 State에 with TickerProviderStateMixin을 해주어야 합니다.
The argument type '_ButtonViewState' can't be assigned to the parameter type 'TickerProvider'.
** Flutter engine은 60frames/s 마다 Rendering하는 scheduler를 가지고 있는데, state가 바뀌어 setState()가 불리거나 UI를 update해야 하는 순간이 오면, 그다음 scheduled frame에 Rendering을 진행합니다.
** Ticker : Flutter engine이 새로운 frame을 Rendering하기 위해 사용하는 timer로, Timer보다 정교하고, Rendering 타이밍(Refresh Rate)에 맞춰 사용할 수 있기 때문에 사용됩니다. 또한 Ticker는 해당 위젯이 Visible할 때만 불립니다.
** SingleTickerProviderStateMixin : 하나의 AnimationController를 사용시
** TickerProviderStateMixin : 하나 이상의 AnimationController를 사용시
2. Why? (원인)
- X
3. How? (해결책)

- 버튼에 Scale 애니메이션 적용하기 :
- timimg은 AnimationController()을 사용했습니다.
- 위의 timing에 맞춰 Transform.scale() 함수를 활용해 동작을 반영했습니다.
- Trigger 방법은 위 선언한 AnimationController에 직접 forward(), reverse() 함수를 사용했습니다.
// Caller
ButtonView(
    onTap: viewModel.onLightPressed,
    heroTag:'light',
    child: ImageIcon(
              viewModel.light_on
              ? AssetImage("images/on.png")
                  : AssetImage("images/off.png"),
              size: 50,
              color: viewModel.light_on ? kSelectedColor : kSubColor,
            ),
)
// Callee
import 'package:flutter/material.dart';
class ButtonView extends StatefulWidget {
final VoidCallback onTap; // 혹은 final Function(bool)? onTap;
final Widget child;
final String heroTag;
ButtonView({
required this.onTap,
required this.child,
required this.heroTag,
Key? key
}) : super(key: key);
@override
_ButtonViewState createState() => _ButtonViewState();
}// Callee State
class _ButtonViewState extends State<ButtonView> with SingleTickerProviderStateMixin{
final Duration time = const Duration(milliseconds: 100);
late AnimationController _buttonController = AnimationController(
vsync: this,
duration: time,
lowerBound: 0.0,
upperBound: 0.4,
)..addListener(()=>setState((){}));
@override
void initState(){
super.initState();
}
@override
Widget build(BuildContext context) {
return FloatingActionButton(
backgroundColor: kMainColor.withOpacity(0.0),
heroTag: widget.heroTag,
onPressed: (){
_buttonController.forward();
print('forward!!');
Future.delayed(
time,
(){_buttonController.reverse();}
);
print('backward!!');
widget.onTap();
},
child:Transform.scale(
scale:1+_buttonController.value,
child:widget.child
)
);
}
}
- 버튼에 Rotate 애니메이션 적용하기 :
- timimg은 AnimationSwitcher()와 transitionBuilder에 넣을 Tween을 사용했습니다.
** Tween : begin 부터 end 까지 값을 변화시키거나 Curve등을 활용해 Animation 효과를 변형할 때 사용합니다.
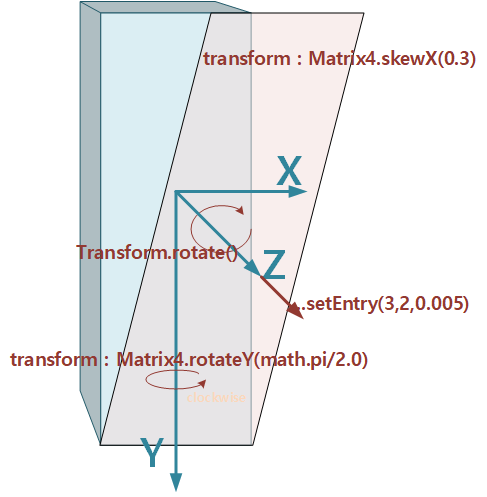
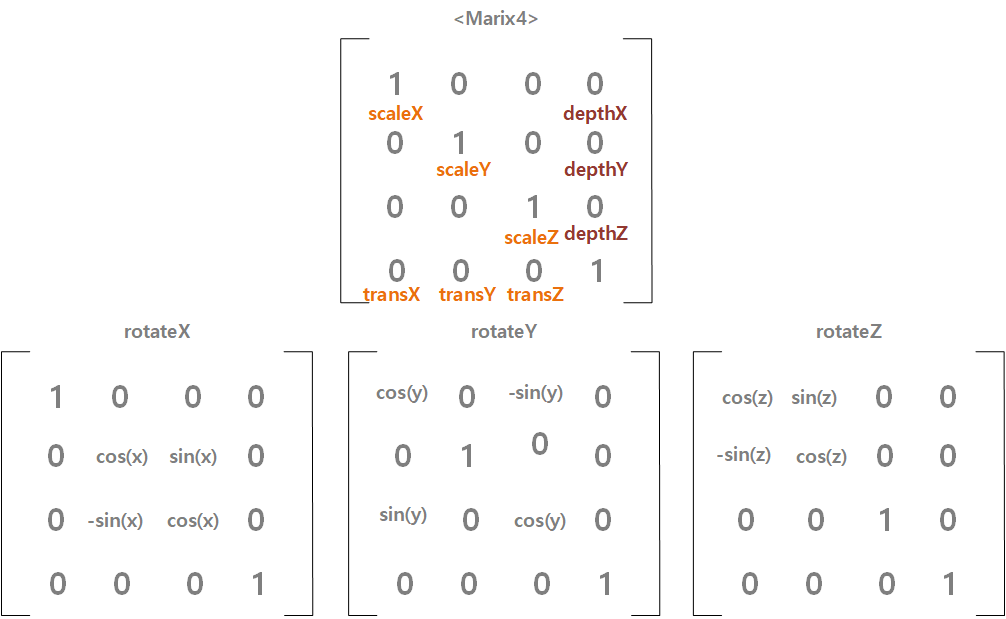
(Curve와 관련해서는 아래 더보기를 참조하세요) - 위 타이밍에 맞춰 transitionBuilder에 넣을 AnimationBuilder()함수를 활용했으며, Rotate는 Transform() 자체함수를 사용해 Matrix4 구조체를 활용해 효과를 주었습니다. 자세한 내용은 아래 그림과 더보기를 참조하시면 좋습니다.
- trigger는 showFront라는 변수를 false ↔ true 변환하는 방법으로 진행했습니다.
- timimg은 AnimationSwitcher()와 transitionBuilder에 넣을 Tween을 사용했습니다.
-----------------------------------------------------------------------------------------------------
<Tween과 Curve를 같이 사용한 예시>
animate- Animation<Offset> cupSlideUpAnimation = Tween(begin: 0.0, end: 0.07).animate(
CurvedAnimation(
parent: animation,
curve: const ShakeCurve(count: 3))); - Animation<double> cupRotateAnimation = Tween(begin: Offset(0, 1), end: Offset(0, 0)).animate(
CurvedAnimation(
parent: animation,
curve: Curves.elasticOut)); - Animation<double> cupFadeInAnimation = Tween(begin: 0.0, end: 1.0).animate(
CurvedAnimation(
parent: animation,
curve: Curves.easeOutCubic));
-----------------------------------------------------------------------------------------------------
// Caller
ButtonView2(
  onTap: viewModel.onReversePressed,
  child: ImageIcon(
            AssetImage("images/btn.png"),
            size: 50,
            color: kSubColor,
          ),
  heroTag: 'reverse'
)
// Callee
import 'package:flutter/material.dart';
import 'dart:math' as math;
class ButtonView2 extends StatefulWidget {
final VoidCallback onTap;
final Widget child;
Widget? child_back;
final String heroTag;
ButtonView2({
required this.onTap,
required this.child,
required this.heroTag,
Key? key
}) : super(key: key){
// initialize back image with original image
child_back = Transform(
key: ValueKey('back'),
transform: Matrix4.rotationY(math.pi),
child:child,
alignment: Alignment.center,
);
}
@override
_ButtonView2State createState() => _ButtonView2State();
}// Callee State
class _ButtonView2State extends State<ButtonView2>{
bool showFront = true;
final Duration time = const Duration(milliseconds: 500);
@override
void initState(){
super.initState();
}
Widget wrapAnimatedBuilder(Widget widget, Animation<double> animation) {
// 0~1 to pi~0
final rotate = Tween(begin: math.pi, end: 0.0).animate(animation);
return AnimatedBuilder(
animation: rotate,
child: widget,
builder: (_, widget) {
//check if current widget is back
final isBack = showFront
? widget?.key == ValueKey('back')
: widget?.key != ValueKey('back');
// when back, pi/2~pi/2~0
// when front, pi~pi/2~0
final value = isBack ? math.min(rotate.value, math.pi / 2) : rotate.value;
var tilt = ((animation.value - 0.5).abs() - 0.5) * 0.0025;
return Transform(
transform: Matrix4.rotationY(value)..setEntry(3, 0, tilt),
child: widget,
alignment: Alignment.center,
);
},
);
}
@override
Widget build(BuildContext context) {
return FloatingActionButton(
backgroundColor: kMainColor.withOpacity(0.0),
heroTag: widget.heroTag,
onPressed: (){
showFront=!showFront;
widget.onTap();
},
child:AnimatedSwitcher(
transitionBuilder: wrapAnimatedBuilder,
layoutBuilder: (widget, list){
return Stack(children:[widget!, ...list]);
},
duration : time,
child : showFront? widget.child : widget.child_back,
)
);
}
}
-----------------------------------------------------------------------------------------------------
<Matrix4 관련>
-----------------------------------------------------------------------------------------------------
https://velog.io/@larsien/UI-challenge-dribble
https://lucky516.tistory.com/123
https://blog.codefactory.ai/flutter/card-flip/
https://codewithandrea.com/articles/flutter-timer-vs-ticker/
'Developers 공간 [Shorts] > Frontend' 카테고리의 다른 글
| [Flutter] Platform 정보를 확인하기 위한 방법 정리 (0) | 2023.04.02 |
|---|---|
| [Flutter] Stacked에서 view와 viewModel의 생성 순서 (0) | 2023.04.02 |
| [Flutter] Portrait, Landscape mode 막기 (0) | 2023.03.28 |
| [Flutter] ios 셋팅 수정 및 다양한 상황에서 문제 해결하기 (0) | 2023.03.27 |
| [Flutter] 카메라 촬영 후 보이는 그대로 저장하기 (1) | 2023.03.26 |