
2025. 4. 10. 00:07ㆍDevelopers 공간 [Shorts]/Software Basic
<분류>
A. 수단
- OS/Platform/Tool : Linux, Kubernetes(k8s), Docker, AWS
- Package Manager : node.js, yarn, brew,
- Compiler/Transpillar : React, Nvcc, gcc/g++, Babel, Flutter
- Module Bundler : React, Webpack, Parcel
B. 언어
- C/C++, python, Javacsript, Typescript, Go-Lang, CUDA, Dart, HTML/CSS
C. 라이브러리 및 프레임워크 및 SDK
- OpenCV, OpenCL, FastAPI, PyTorch, Tensorflow, Nsight
1. What? (현상)
Text-To-Image Diffusion 논문을 보다보면 feature를 visualize해서 네트워크 내 어떤 feature에 집중해서 처리하고 있는지를 확인하는 과정이 있기도 합니다.
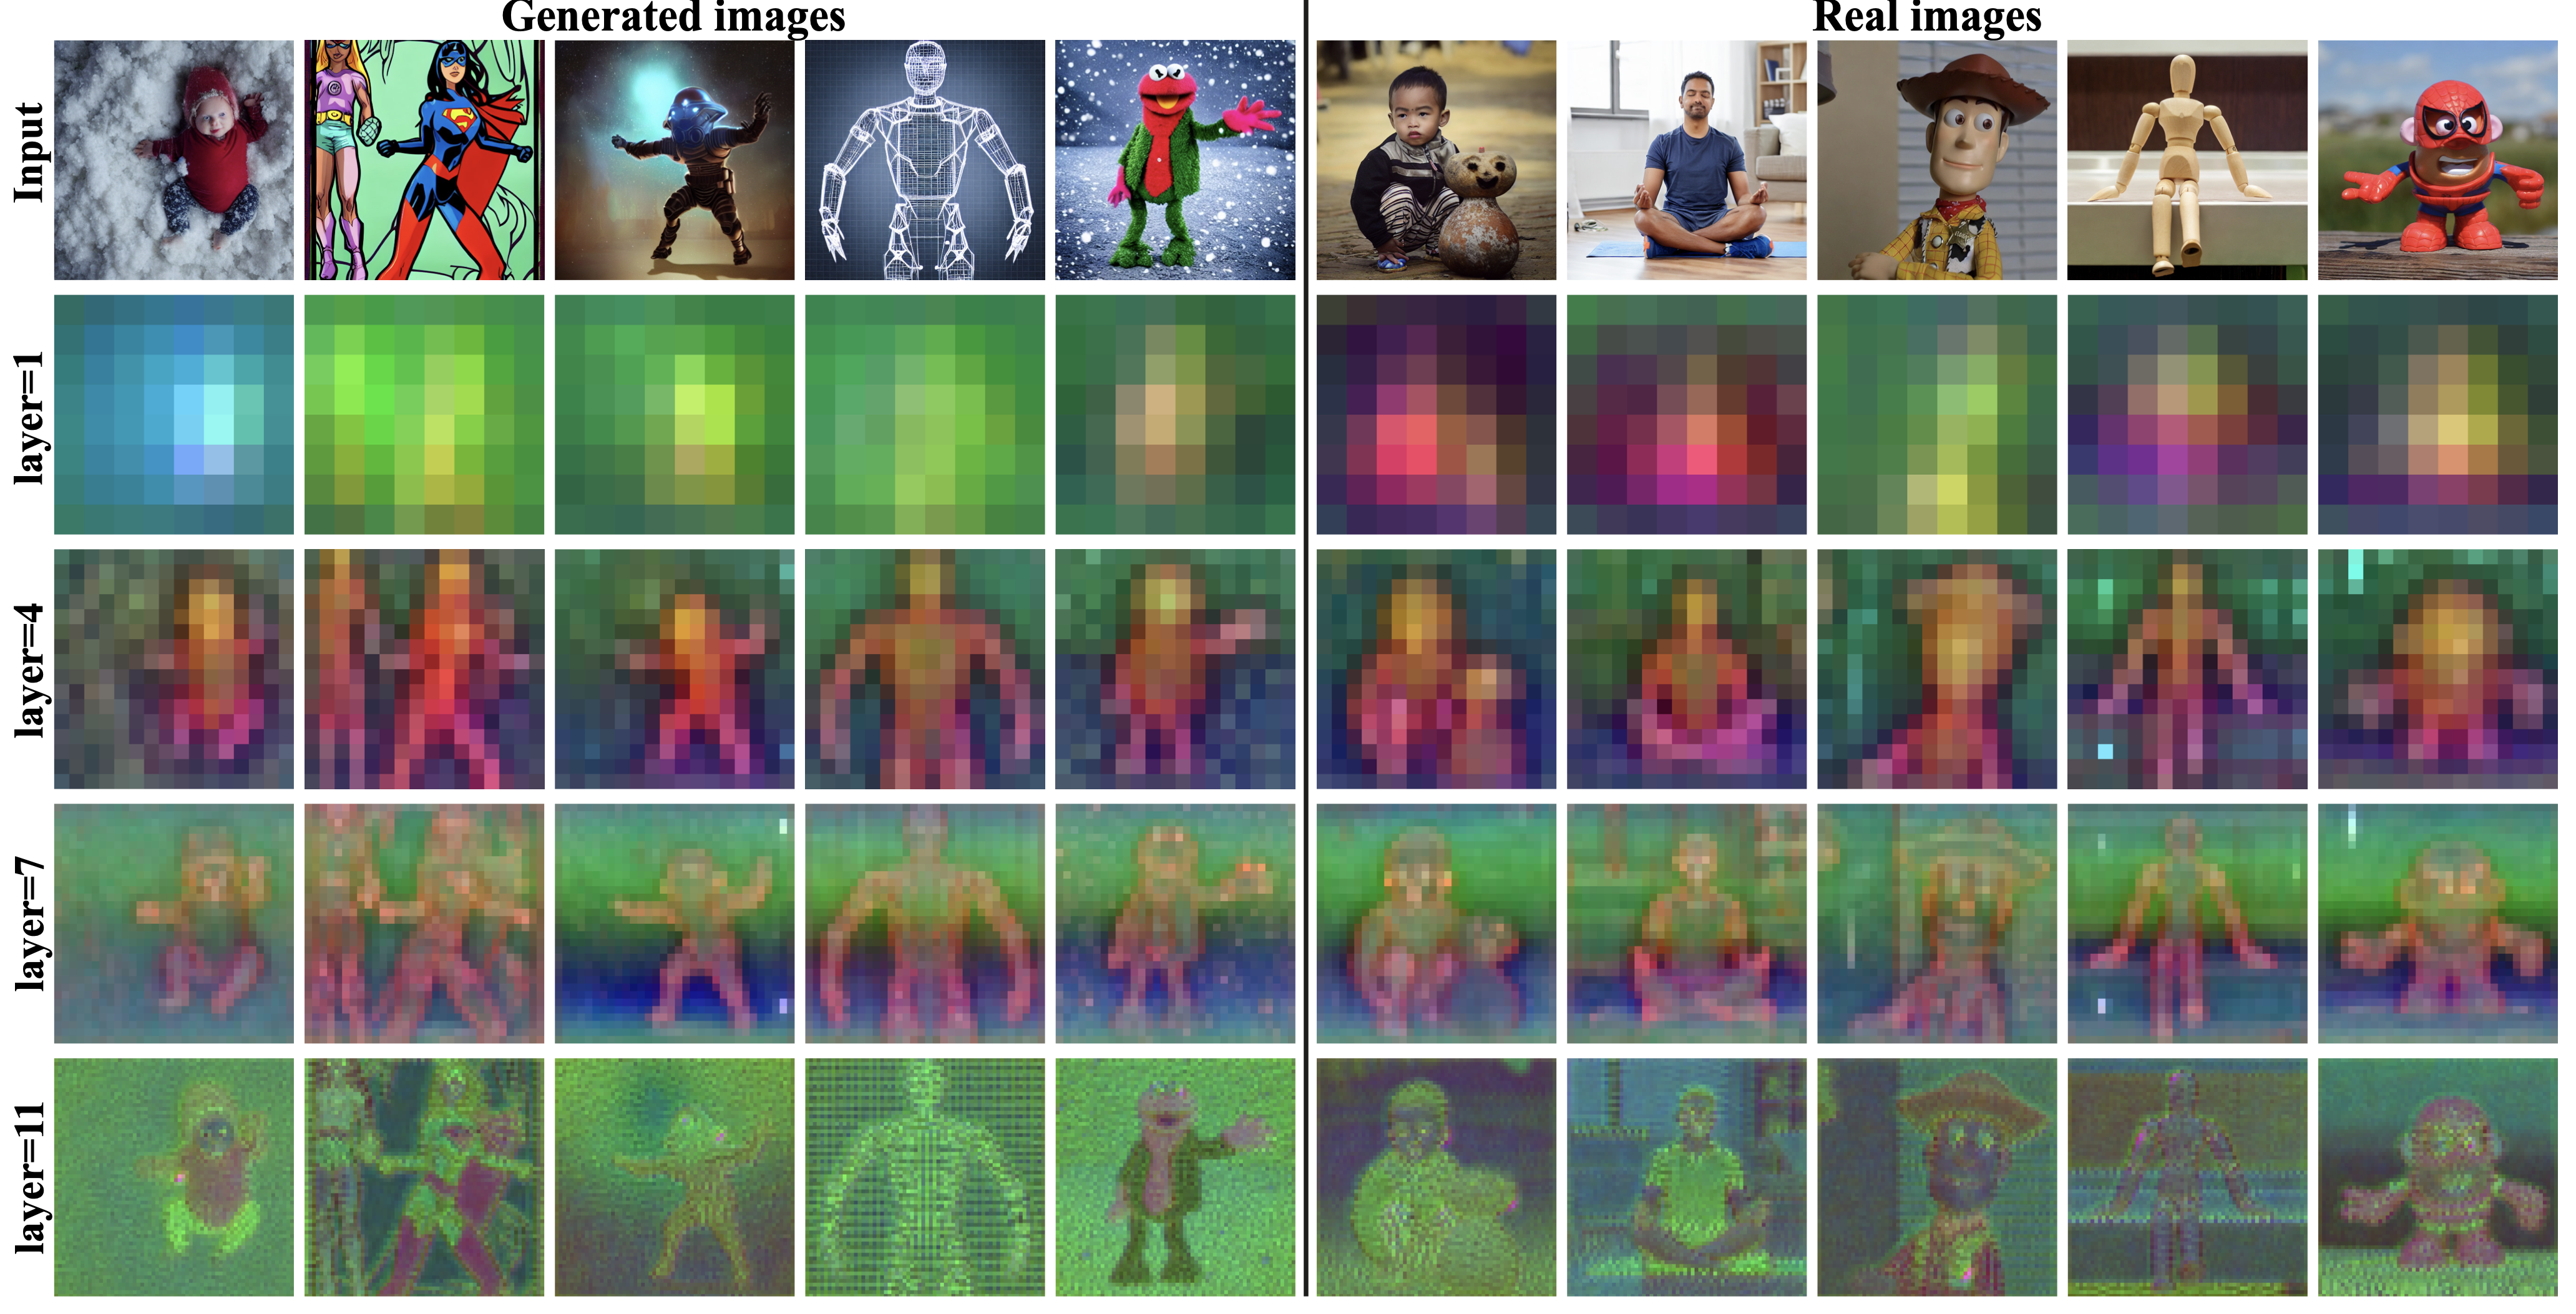
예를 들어 아래 같은 경우는 각 decoder layer에서 나온 spatial feature들을 Top-3 leading components에 대해 PCA를 적용해 실제 이미지와 비교한 결과입니다. 이는 각 layer가 어떤 feature에 집중하고 있는지를 살펴볼 수 있겠죠.
** Plug-and-play diffusion features for text-driven image-to-image translation(CVPR'23)
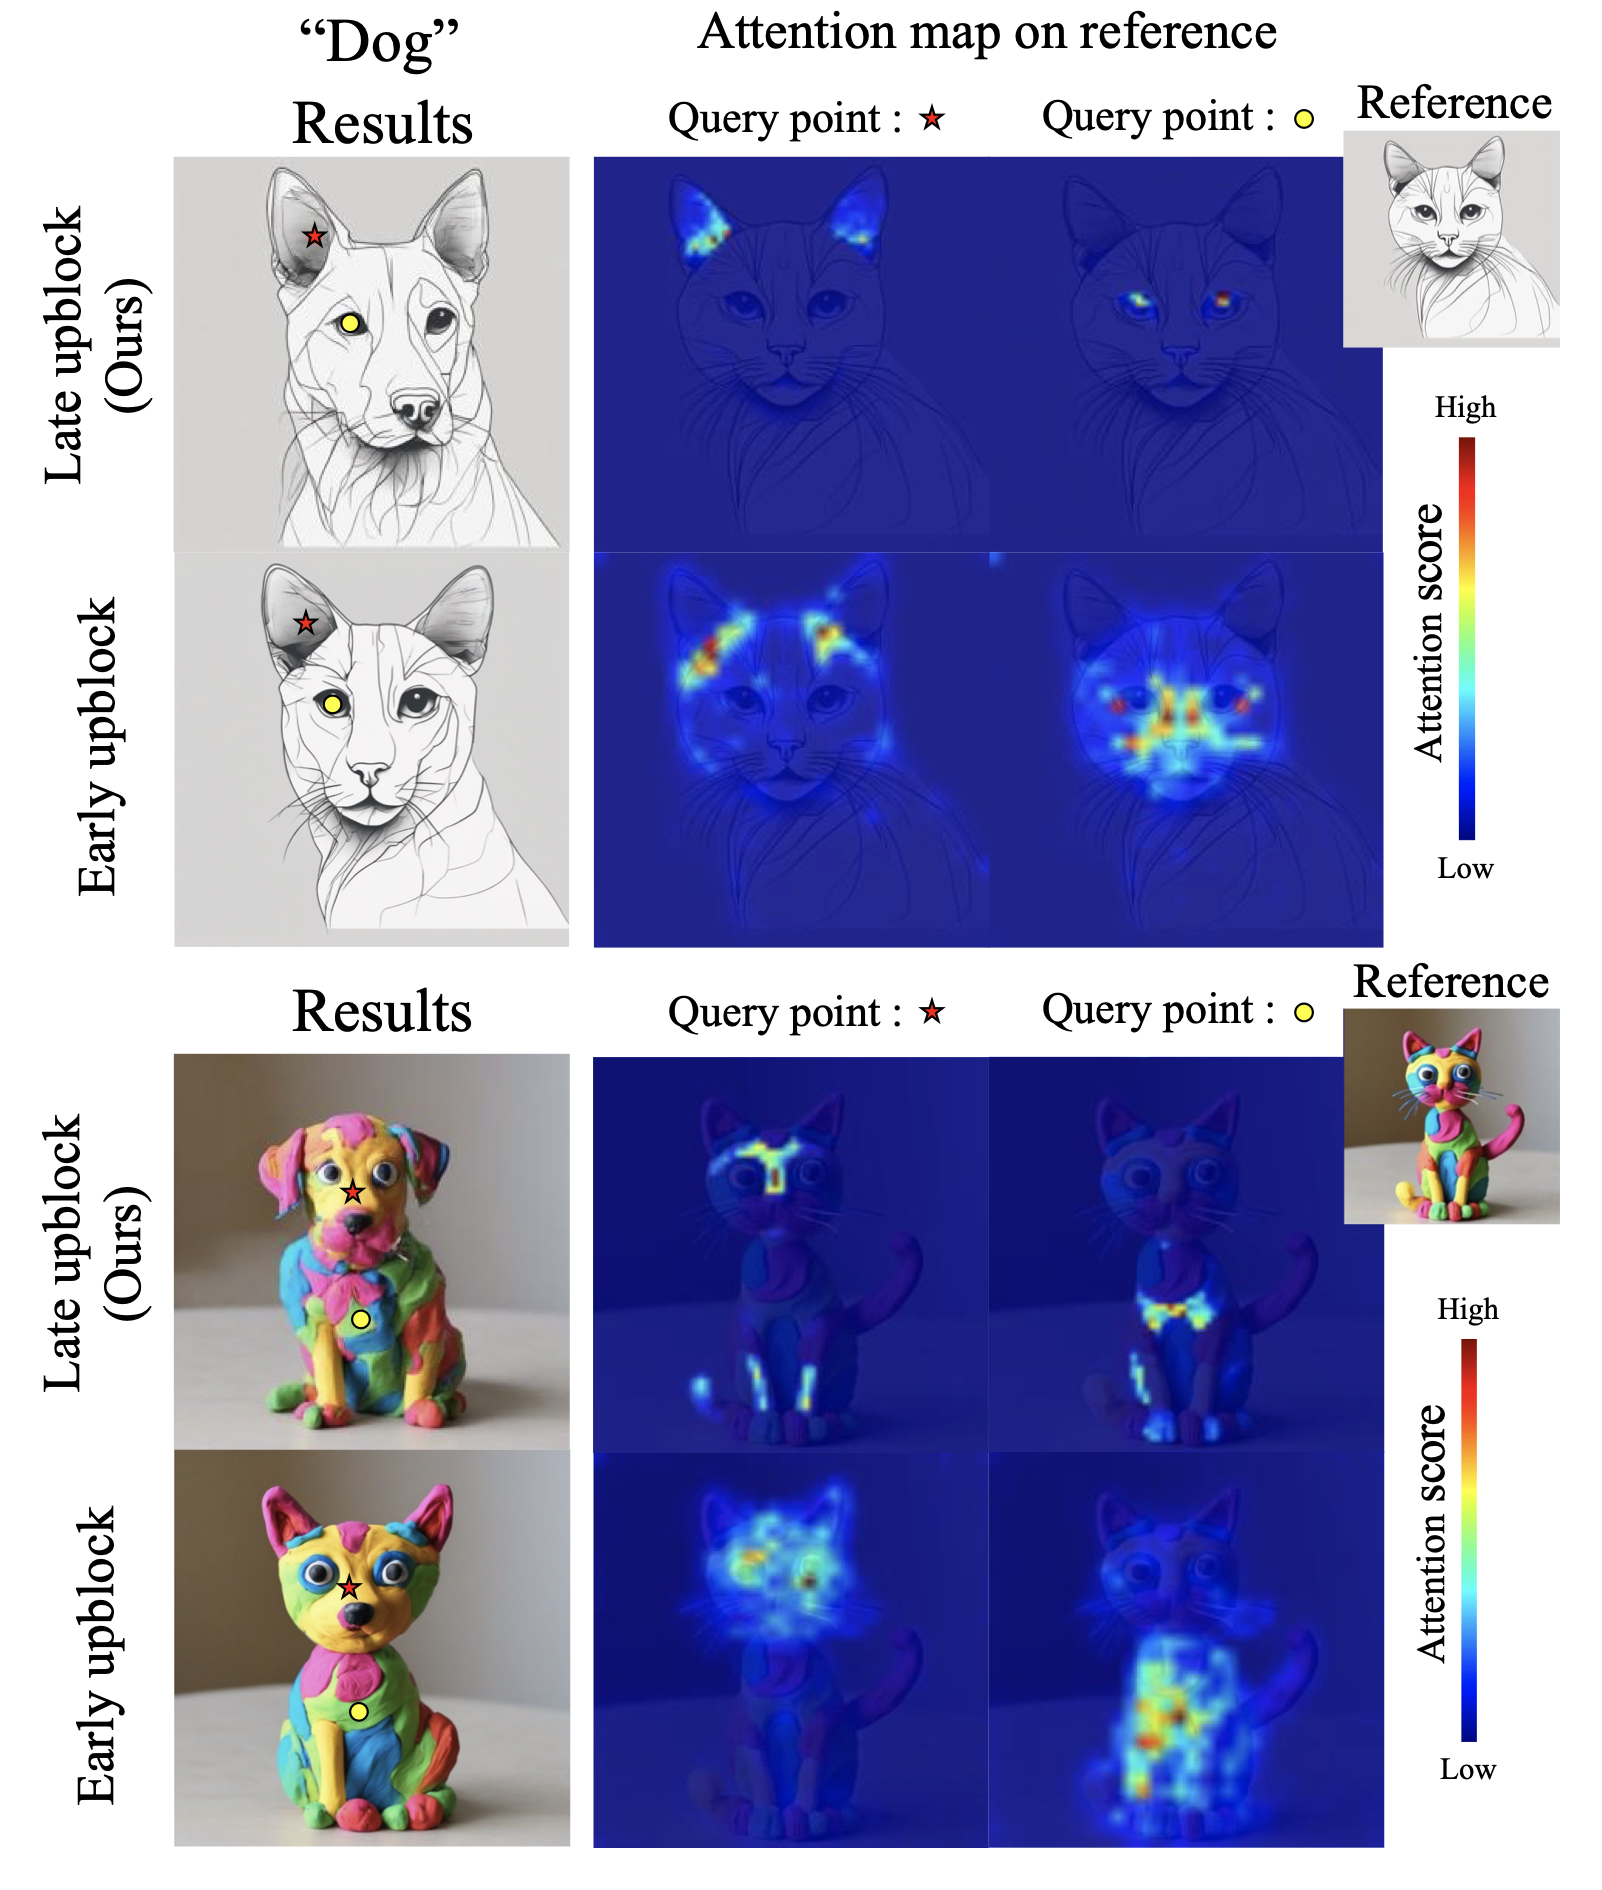
아래는 Self-Attention Map을 display해서 layer 별로 어떤 feature에 집중하고 있는지를 살펴보는 과정입니다.
** Visual Style Prompting with Swapping Self-Attention (arxiv'24)
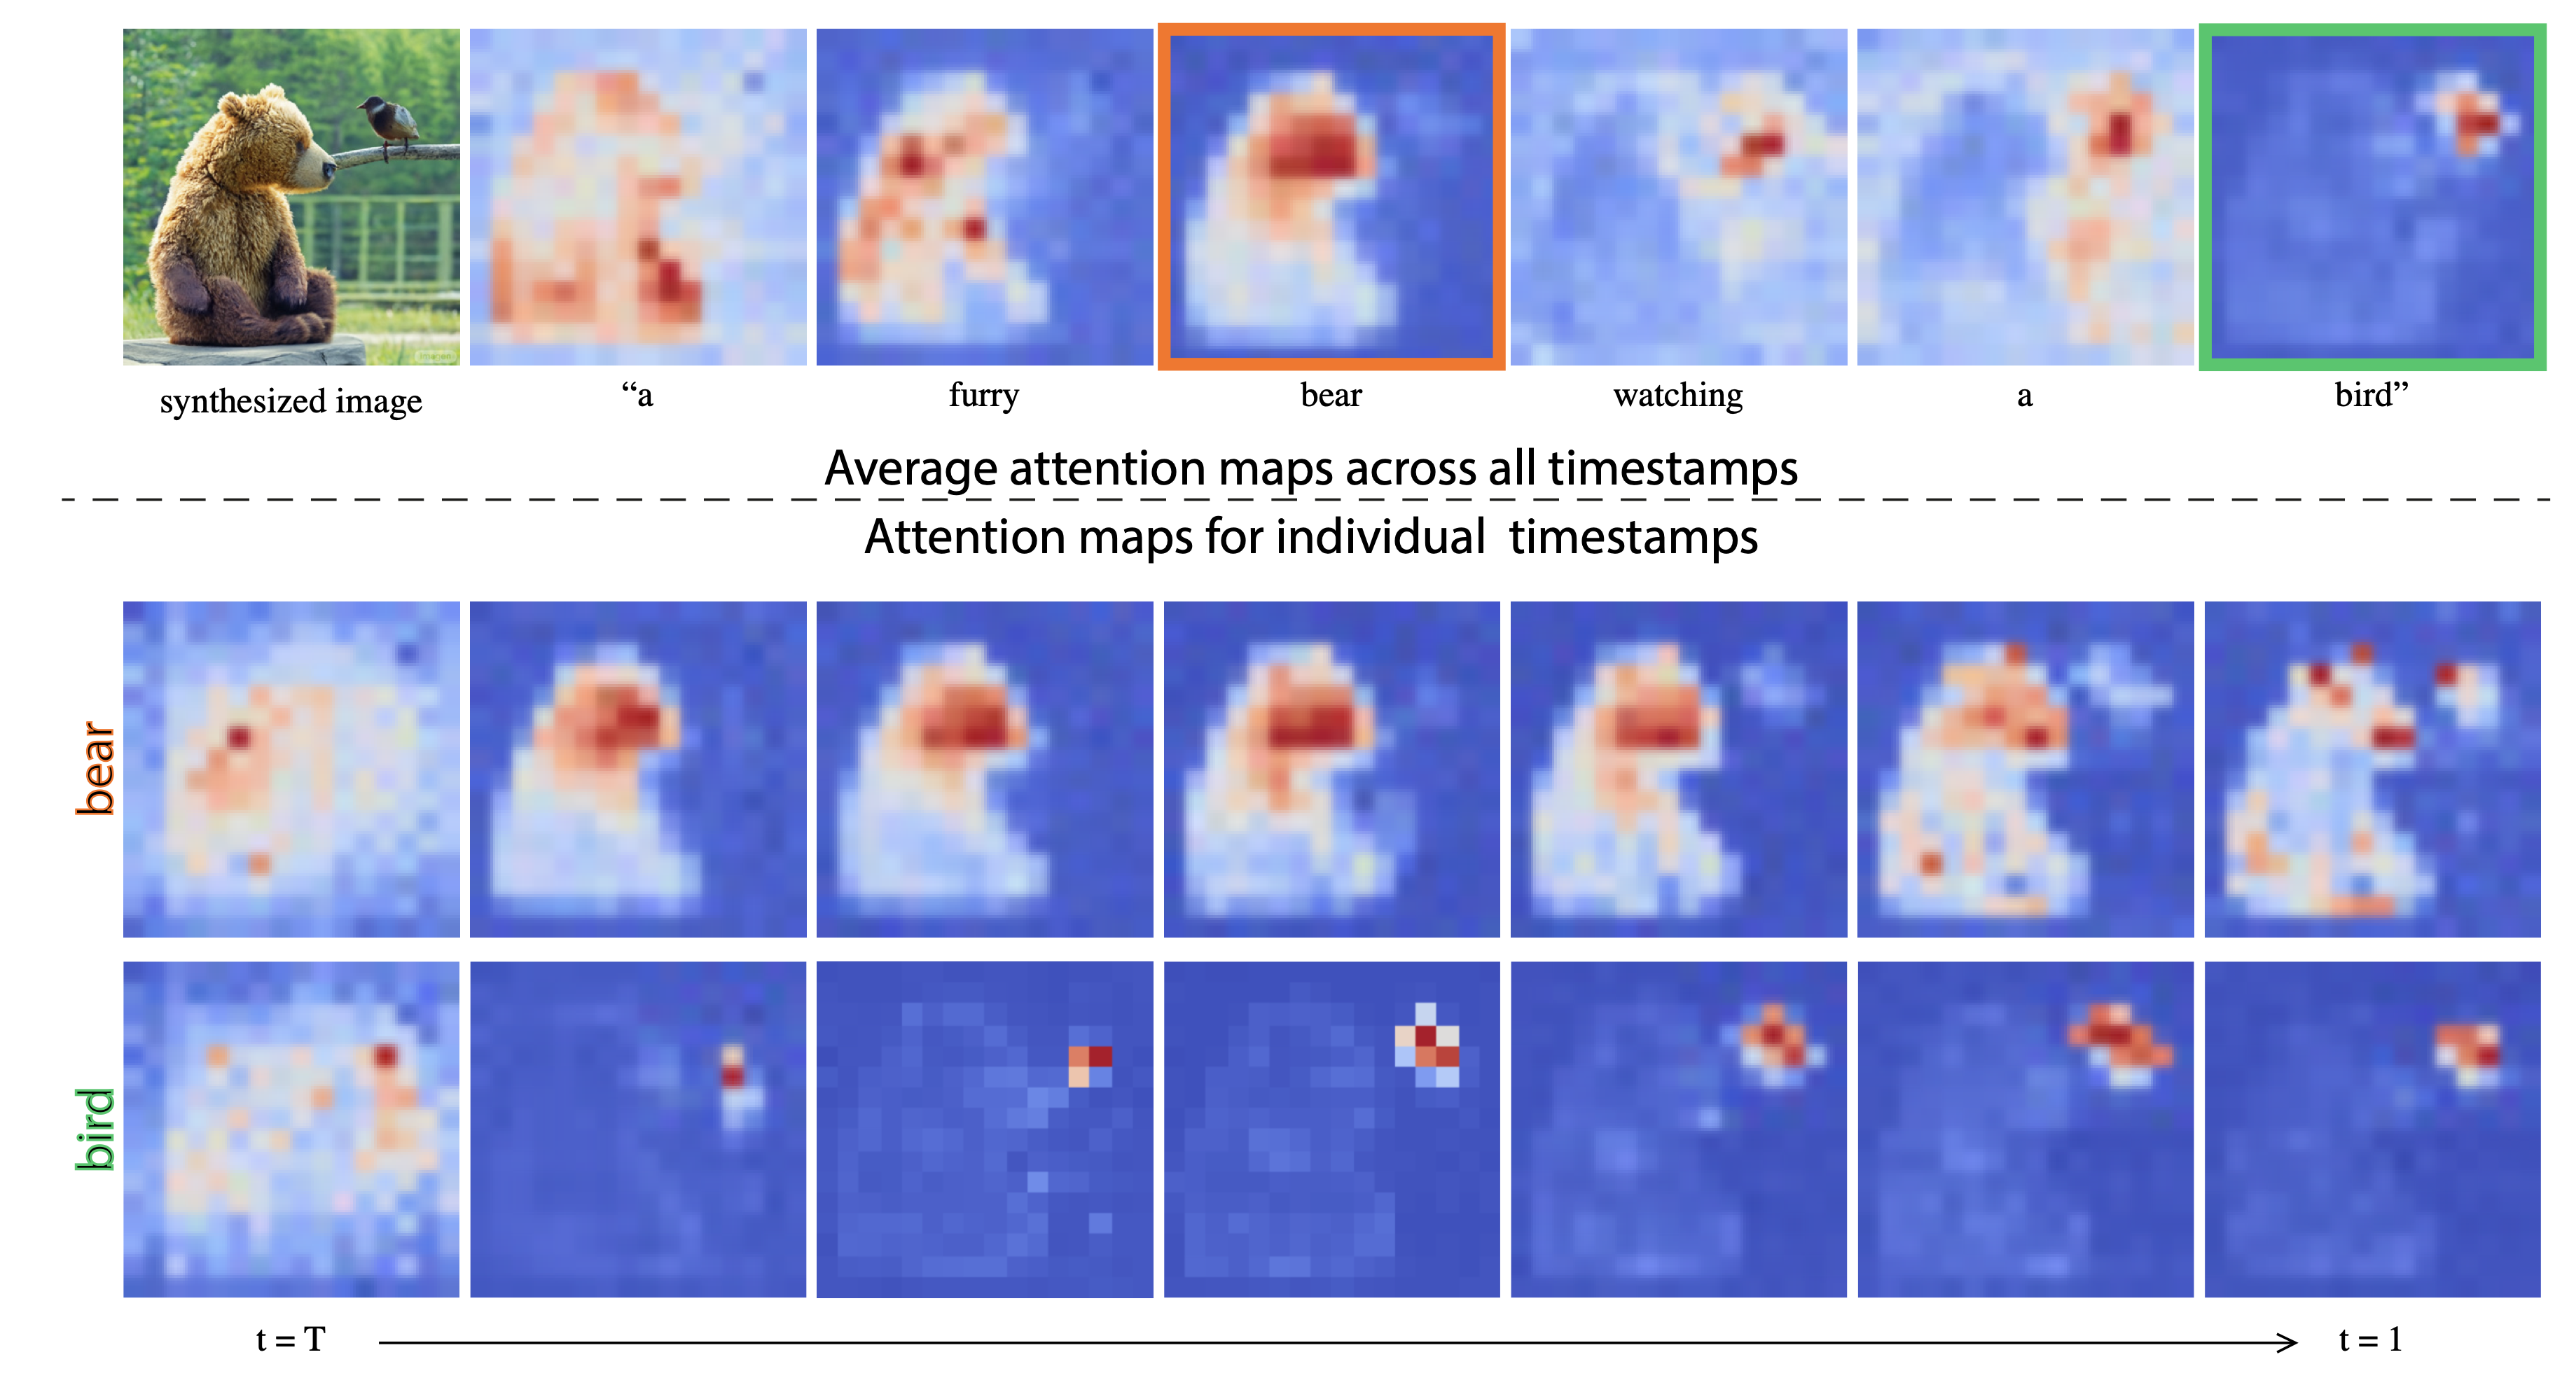
위에서는 각 layer에서 나온 feature 자체를 살펴보고 어떤 것에 집중하는지를 살펴본다면, 아래 같은 경우 Text Condition에 따른 Cross-attention map을 비교하는 방법을 통해, Condition이 어디에 집중해서 생성하게 되는지를 살펴보기도 합니다.
** Prompt-to-prompt image editing with cross attention control(arxiv'22)
이번 글에서는 위와 같은 Cross Attention map을 display하기 위해 scaled_dot_product_attention()함수를 직접 customize하는 방법을 보이려고 합니다.
2. Why? (원인)
- X
3. How? (해결책)
아시다 시피 Attention은 아래와 같습니다.
$$Attention(Q,K,V)={\color{red}softmax(\frac{QK^\top}{\sqrt{d_k}})}V$$
이중 attention map은 $softmax(\frac{QK^\top}{\sqrt{d_k}})$입니다. 즉, Key와 Query간의 관계에 관련된 Weight Map이죠.
일단 기존에 아래와 같이 Key, Query, Value들에 대한 위 Attention결과는 아래와 같이 구성될 것입니다.
import torch.nn.functional as F
out = F.scaled_dot_product_attention(
    q, k, v,
    attn_mask=mask,
    is_causal=causal
)
이를 직접 만든 custom_scaled_dot_product_attention()으로 대체할 계획입니다.
out = custom_scaled_dot_product_attention(
     q, k, v,
     attn_mask=mask,
     is_causal=causal
 )
그럼 이번엔 custom_scaled_dot_product_attention()함수를 기존과 똑같이 기능하도록 구현해보겠습니다.
import torch
import torch.nn.functional as F
import typing as tp

def custom_scaled_dot_product_attention(q, k, v,
                    attn_mask=None,
                    dropout_p=0.0,
                    is_causal=False):
    """
    q : (batch, num_heads, seq_lenA, head_dim)
    k, v : (batch, num_heads, seq_lenB, head_dim)
    attn_mask: (batch, seq_len, seq_len)
    """

    d_k = q.size(-1)
    # 1. QK^T / sqrt(d_k)
    attn_scores = torch.matmul(q, k.transpose(-2, -1)) / torch.sqrt(torch.tensor(d_k, dtype=q.dtype, device=q.device))

    # 2. causal mask
    if is_causal:
        seq_len = q.size(-2)
        causal_mask = torch.tril(torch.ones((seq_len, seq_len), dtype=torch.bool, device=q.device))
        causal_mask = causal_mask.unsqueeze(0).unsqueeze(0)  # (..., 1, seq_len, seq_len)
        attn_scores = attn_scores.masked_fill(~causal_mask, float('-inf'))

    # 3. attention mask
    if attn_mask is not None:
        attn_scores += attn_mask

    # 4. softmax (attention weights)
    attn_weights = F.softmax(attn_scores, dim=-1)

    # 5. dropout
    if dropout_p > 0.0:
        attn_weights = F.dropout(attn_weights, p=dropout_p)

    # 6. attention output
    output = torch.matmul(attn_weights, v)

    return output
이제 특정상황에 앞서 구했던 attn_weights를 저장하도록 위 함수 내에 함수를 만들어보겠습니다.
아래는 save_ix라는 layer의 index를 활용해서 주어지면 해당 layer의 weight map을 저장하도록 하려고 합니다.
이 때 사이즈는 아래와 같을 것입니다.
- query의 사이즈 : (batch, num_heads, seq_lenA, head_dim)
- key와 value의 사이즈 : (batch, num_heads, seq_lenB, head_dim)
- attn_weights의 사이즈 : (batch, num_heads, seq_lenA, seq_lenB)
import torch
import torch.nn.functional as F
import typing as tp

def custom_scaled_dot_product_attention(q, k, v,
                    attn_mask=None,
                    dropout_p=0.0,
                    is_causal=False,
                    save_ix=-1,
                    time_step=-1,
                    mode:tp.Literal["tensor", "numpy", "heatmap", "pca"]="pca" ):

    # ...

    if save_ix !=-1:
        save_tensors(attn_weights, save_ix, time_step, mode=mode)

    return output
save_tensors()를 한번 보겠습니다. 첫번째 batch에 대해서만 적용할 것이고, 아래와 같은 4가지 버전의 상황이 있습니다.
- tensor 모드 : tensor객체를 저장
- numpy 모드 : numpy객체를 저장
- heatmap 모드 : [query, key] weight를 query를 기준으로 key값으로 그대로 나타내보려고 합니다.
** head간에는 평균값을 사용하려고 합니다. - pca 모드 : [query, key] weight를 query를 기준으로 key값들의 pca결과를 나타내보려고 합니다.
** head간에는 평균값을 사용하려고 합니다.
from pathlib import Path
import numpy as np

def save_tensors(attn_weights, save_ix, time_step, mode:tp.Literal["tensor", "numpy", "heatmap", "pca"]="pca"):
    time_step_pos = time_step[0]
    time_step_pos = int(time_step_pos * 10000.0)

    b_size, h_num, q_len, k_len = attn_weights.shape

    # [B, #heads, query_len, key_len] > [#heads, query_len, key_len] > [query_len, key_len]
    attn_weights_pos_avg = attn_weights.mean(dim=1)[0].detach().cpu()

    Path("./output_test").mkdir(parents=True, exist_ok=True)
    if mode=="tensor":
        filename = f'output_test/crossattn_tensor_{time_step_pos:04d}_layer{save_ix:03d}.pt'
        torch.save(attn_weights_pos_avg, filename)
        return
    attn_weights_pos_avg = attn_weights_pos_avg.numpy()
    if mode=="numpy":
        filename = f'output_test/crossattn_numpy_{time_step_pos:04d}_layer{save_ix:03d}.npy'
        np.save(filename, attn_weights_pos_avg)
    elif mode=="heatmap":
        filename = f'output_test/crossattn_heatmap_{time_step_pos:04d}_layer{save_ix:03d}.png'
        title = f'Mean AttentionMap : Heatmap (step 0.{time_step_pos:04d}, layer {save_ix:02d})'
        save_attention_heatmap(attn_weights_pos_avg, save_path=filename, title=title)
    elif mode=="pca":
        filename = f'output_test/crossattn_pca_{time_step_pos:04d}_layer{save_ix:03d}.png'
        title = f'Mean AttentionMap : Text PCA-Reduced (step 0.{time_step_pos:04d}, layer {save_ix:02d})'
save_attention_pca(attn_weights_pos_avg, save_path=filename, title=title)-------------------------------------------------------------
<다른 PyTorch 객체를 저장하기>
위에서 구현한 save_tensors()를 기존 latent에 적용해서 저장할 수도 있습니다.
from einops import rearrange
from .common.tk_attention import save_tensors

# latents : [Batch, latents, query]
latents_save = rearrange(latents, 'b l q -> b 1 q l')
save_tensors(latents_save, 100, torch.tensor([0.0]))
-------------------------------------------------------------
save_attention_heatmap()과 save_attention_pca()는 각각 heatmap과 pca를 저장하는 함수로 matplotlib를 활용해 구현하면 됩니다.
아래는 예시로 필자가 구현한 함수들을 보입니다. 필자는 오디오와 텍스트에 대한 Attention Map에 적용해보았습니다.
import matplotlib.pyplot as plt

def save_attention_heatmap(attn_map, save_path="attn_heatmap.png", title="Mean AttentionMap : Heatmap"):
    """
    attn_map: (q_len, k_len)
    Saves mean attention heatmap as PNG.
    """
    q_len, k_len = attn_map.shape

    attn_map = attn_map.T # [k, q]

    plt.figure(figsize=(10, 4))
    plt.title(title)

    plt.imshow(attn_map, cmap='magma', aspect="auto")
    plt.colorbar(label="Attention Weight")

    plt.xlabel("Query(Audio Token) Index", fontsize=10)
    plt.ylabel("Key Text Token Index", fontsize=10)
    plt.ylim((0, k_len))
    plt.xlim((0, q_len))

    plt.tight_layout()
    plt.savefig(save_path, dpi=150)
    plt.close()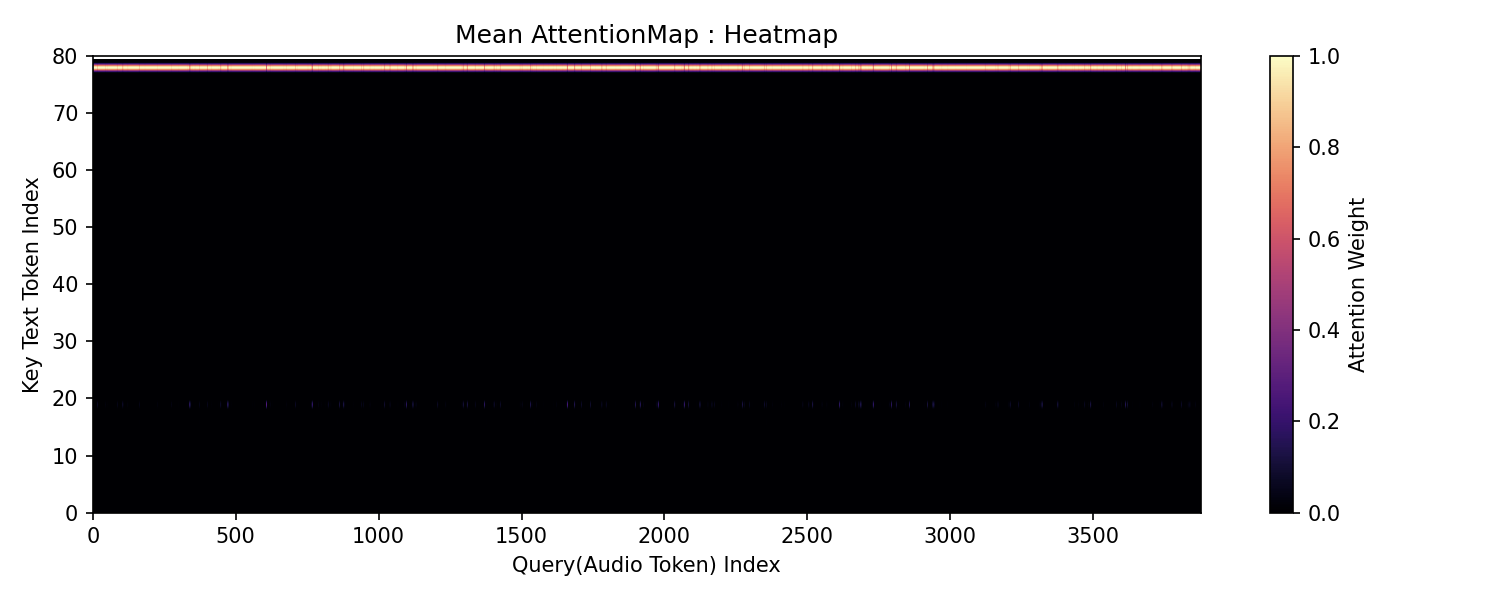
import matplotlib.pyplot as plt
from sklearn.decomposition import PCA

def save_attention_pca(attn_map, save_path="attn_pca_heatmap.png", title="Mean AttentionMap : Text PCA-Reduced"):
    """
    attn_map: (q_len, k_len)
    Saves PCA-reduced attention map as PNG.
    """

    q_len, k_len = attn_map.shape

    # PCA over keys for each query
    pca = PCA(n_components=1)
    reduced = pca.fit_transform(attn_map)[:,0] # (q, 1)

    plt.figure(figsize=(10, 4))
    plt.plot(range(q_len), reduced, color='tomato', linewidth=2)
    plt.title(title)

    plt.axhline(0, color='black', linestyle='--', linewidth=1)
    plt.grid(alpha=0.3)

    plt.xlabel("Query(Audio Token) Index")
    plt.ylabel("Key Text 1st Principal Component")
    plt.ylim((-0.5, 0.5))
    plt.xlim((0, q_len))

    plt.tight_layout()
    plt.savefig(save_path)
    plt.close()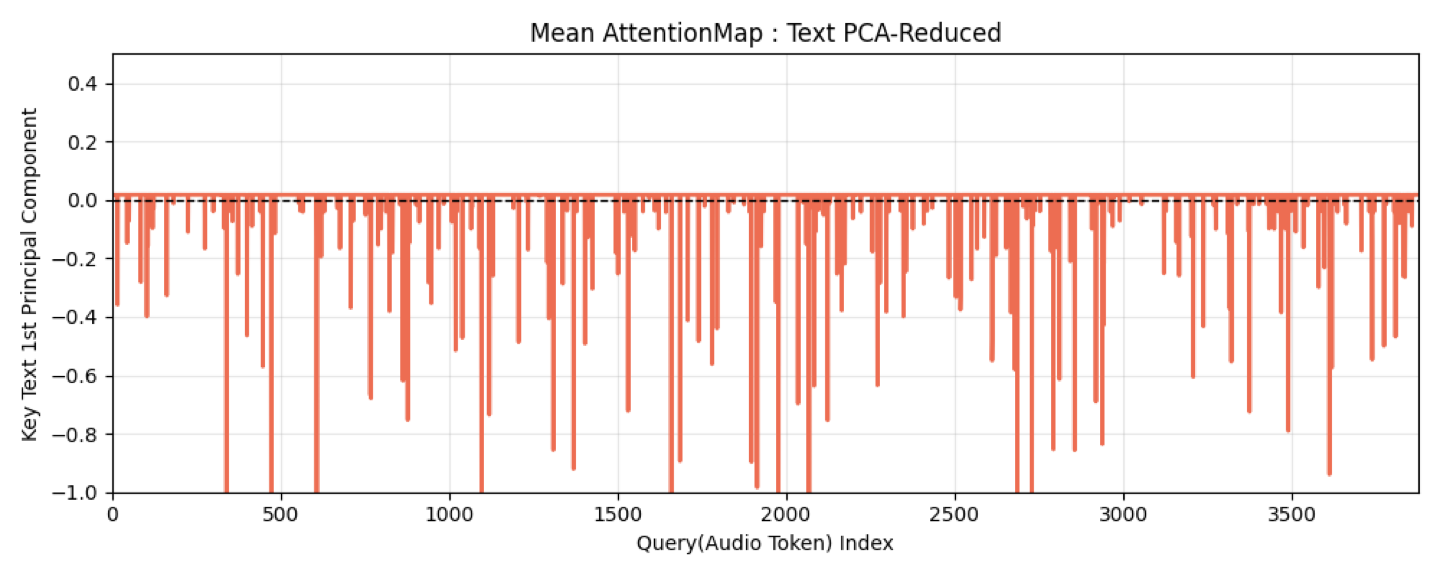
'Developers 공간 [Shorts] > Software Basic' 카테고리의 다른 글
| [PyTorch] Tensor와의 기본연산시 Broadcasting 문제 (0) | 2025.04.29 |
|---|---|
| [Bash] 여러개의 Disk를 모아서 mount하기 (0) | 2025.04.28 |
| [Bash] Rsync활용하기 (0) | 2025.03.17 |
| [Python] 서버 동작시 다른 파일 dynamic하게 import하기 (0) | 2025.03.17 |
| [Git] Feature 브랜치에서 master 관리자의 작업파일로 대체하기 (0) | 2025.03.17 |